Docker and Kubernetes - A Practical Guide
Introduction
Docker has fundamentally changed how we build, ship, and run applications. This guide covers practical Docker workflows, from image management to Kubernetes cluster deployment, based on real-world implementation experience.
Docker Storage Architecture
Understanding Image Storage
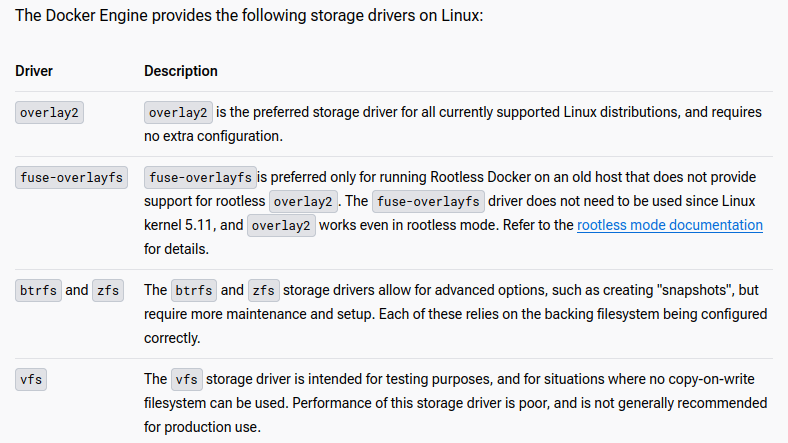
Docker stores images and container layers in /var/lib/docker by default. The specific subdirectory structure depends on the configured storage driver, which determines how Docker manages image layers and container filesystems.
Identifying Your Storage Driver
Check your current storage driver configuration:
docker info | grep "Storage Driver"
# Output: Storage Driver: overlay2
The overlay2 driver is the recommended choice for modern Linux kernels, offering better performance and inode efficiency compared to older drivers like aufs or devicemapper.
Container and Image Management
Cleanup Commands
Maintain a healthy Docker environment with regular cleanup:
# Stop all running containers
docker stop $(docker ps -a -q)

# Remove all containers
docker rm $(docker ps -a -q)

# Remove dangling images (untagged/unused)
docker rmi $(docker images -f "dangling=true" -q)

# Remove unused volumes
docker volume rm $(docker volume ls -f dangling=true -q)
Analyzing Image Sizes
Sort and display images by size for storage optimization:
docker images --format '{{.Size}}\t{{.Repository}}\t{{.Tag}}\t{{.ID}}' | \
  sed 's/ //' | sort -h | column -t
Example Output:
1.24MB   busybox                        latest    bc01a3326866
18.6MB   gns3/openvswitch              latest    64b5202d0623
56.4MB   google/shaka-packager         latest    fbda4f81f776
117MB    redis                         latest    f9c173b0f012
202MB    postgres                      10        1cad456b3a24
1.3GB    ansible/awx                   14.1.0    8a29b4e35f5f
Creating Efficient Dockerfiles
Multi-Stage Build Example
# Use an official Python runtime as a parent image
FROM python:3.8-slim

# Set the working directory
WORKDIR /app

# Copy dependency files first (layer caching optimization)
COPY requirements.txt /app/

# Install dependencies
RUN pip install --no-cache-dir -r requirements.txt

# Copy application code
COPY . /app

# Run the application
CMD ["python", "app.py"]
Best Practices
- Layer Optimization - Order instructions from least to most frequently changing
- Use .dockerignore - Exclude unnecessary files from build context
- Multi-stage Builds - Separate build and runtime environments to reduce image size
- Minimal Base Images - Use Alpine or slim variants when possible
Kubernetes Cluster Setup
Prerequisites Installation
Update your system and install required packages:
sudo apt update
sudo apt install -y apt-transport-https ca-certificates curl net-tools

# Install Docker
sudo apt install docker.io
sudo systemctl start docker
sudo systemctl enable docker
Kubernetes Repository Configuration
Add the Kubernetes package repository:
# Add Kubernetes GPG key
curl -fsSL https://pkgs.k8s.io/core:/stable:/v1.28/deb/Release.key | \
  sudo gpg --dearmor -o /etc/apt/keyrings/kubernetes-apt-keyring.gpg

# Add Kubernetes apt repository
echo "deb [signed-by=/etc/apt/keyrings/kubernetes-apt-keyring.gpg] \
  https://pkgs.k8s.io/core:/stable:/v1.28/deb/ /" | \
  sudo tee /etc/apt/sources.list.d/kubernetes.list
Installing Kubernetes Components
# Update package index
sudo apt-get update

# Disable swap (required for kubelet)
sudo swapoff -a

# Install Kubernetes components
sudo apt install -y kubelet kubeadm kubectl

# Prevent automatic updates
sudo apt-mark hold kubelet kubeadm kubectl

# Verify installations
kubelet --version
kubectl version --client
kubeadm version
Initializing the Control Plane
# Set hostname for clarity
sudo hostnamectl set-hostname kubernetes-master

# Initialize the cluster
sudo kubeadm init \
  --apiserver-advertise-address=192.168.56.10 \
  --pod-network-cidr=192.168.0.0/16
Configuring kubectl Access
# Setup kubeconfig for regular user
mkdir -p $HOME/.kube
sudo cp -i /etc/kubernetes/admin.conf $HOME/.kube/config
sudo chown $(id -u):$(id -g) $HOME/.kube/config

# Or for root user
export KUBECONFIG=/etc/kubernetes/admin.conf
Installing Pod Network (Calico)
# Deploy Calico network plugin
kubectl apply -f https://docs.projectcalico.org/manifests/calico.yaml

# Verify pod network deployment
kubectl get pods -n kube-system
Troubleshooting
Monitor kubelet logs if you encounter issues:
sudo systemctl restart kubelet
sudo journalctl -u kubelet -f
Worker Node Join Process
Generating Join Command
On the control plane node:
kubeadm token create --print-join-commandJoining Worker Nodes
Execute the generated command on worker nodes:
kubeadm join 192.168.56.10:6443 \
  --token o1i282.fofbqewf8jys3xkk \
  --discovery-token-ca-cert-hash sha256:907deb30877b3566dee7c39a4da03b47b6e6a08c37aeb959a2a231090ca433b3
Cluster Management
Essential kubectl Commands
# View cluster information
kubectl cluster-info

# List active tokens
kubeadm token list

# Check node status
kubectl get nodes

# Export cluster configuration
kubectl get cm -n kube-system kubeadm-config -o yaml > kubeadm-config.yaml
Deploying Sample Application
# Create nginx deployment
kubectl apply -f https://k8s.io/examples/controllers/nginx-deployment.yaml

# Or deploy directly
kubectl run --image=nginx nginx-server --port=80 --env="DOMAIN=cluster"

# Expose as service
kubectl expose deployment nginx-deployment --port=80 --name=nginx-http

# List services
kubectl get svc
Resetting the Cluster
If you need to tear down and rebuild:
# Reset kubeadm configuration
sudo kubeadm reset

# Clean up configuration files
sudo rm -rf ~/.kube/ /etc/kubernetes/ /etc/cni/
Lessons Learned
Storage Driver Selection
The overlay2 storage driver provides the best balance of performance and compatibility for modern Linux systems. Understanding your storage driver helps troubleshoot disk space issues and optimize image building.
Kubernetes Networking
Pod networking is critical for cluster functionality. Calico provides a robust CNI plugin with network policy support, but alternatives like Flannel or Weave may better suit specific use cases.
Resource Management
Regular cleanup of unused containers, images, and volumes prevents disk exhaustion. Implementing automated cleanup policies in production environments is essential for long-term stability.